
What Is Bathtub Drain Replacement and How Does It Work?

What Is Bathtub Drain Replacement and How Does It Work? This question matters when water drains slowly, leaks beneath the tub, or leaves a persistent odor. Bathtub Drain Replacement means removing the old drain assembly and installing a new one. The assembly usually includes the drain flange, stopper, gasket, and connecting pipe. Each part must fit tightly. A small mismatch can cause a large leak.

Richard Trethewey, a respected plumbing expert and television educator, offers a useful principle: “Water always wins if a connection is not properly sealed.” His point reflects years of practical plumbing experience. The work often begins by removing the stopper and loosening the drain flange with a drain wrench. The plumber then checks the exposed gasket and surrounding tub surface. Rust, cracked putty, or damaged threads may require additional repair. The new flange receives fresh plumber’s putty or an approved sealant. It is tightened carefully, not forcefully. Too much pressure can damage the tub or distort the seal.

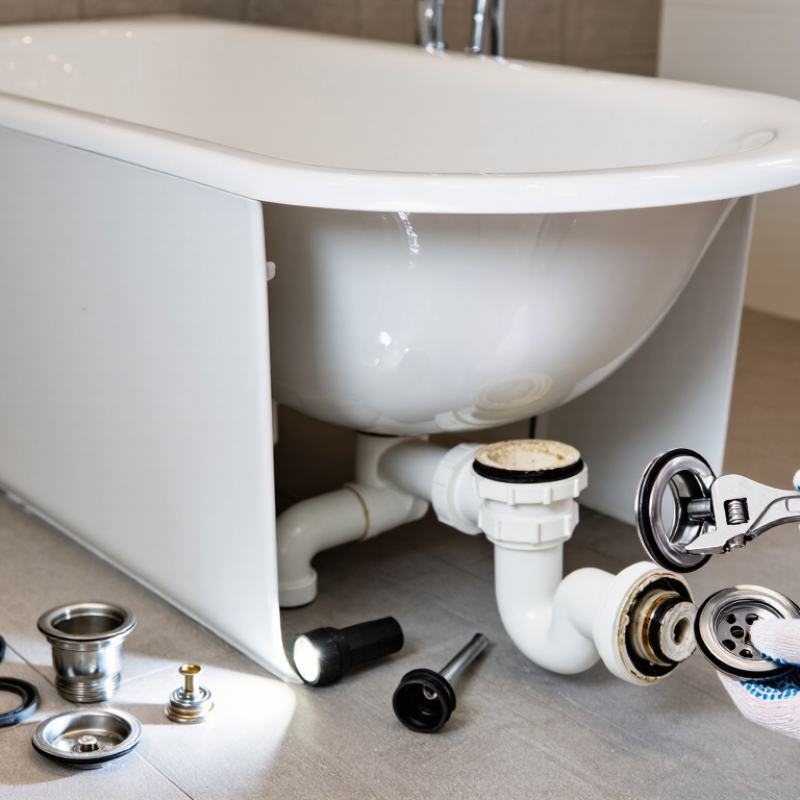
A proper Bathtub Drain Replacement should end with a controlled leak test. Water is added slowly, while the connections underneath are inspected with a flashlight. The process is usually straightforward. It is not always clean. Old fittings may resist removal, and hidden corrosion can change the job completely. I should acknowledge one limitation: replacing the visible drain does not fix every drainage problem. A blocked trap or damaged branch line may need separate attention. Reliable results depend on accurate diagnosis, suitable parts, and careful testing.
What Is Bathtub Drain Replacement and How Does It Work?

Bathtub Drain Replacement: Definition, Purpose, and 1½-Inch Industry Standard

What Is Bathtub Drain Replacement and How Does It Work?

Bathtub drain replacement means removing a worn drain assembly and installing a new one. The assembly usually includes the drain flange, threaded body, gasket, and stopper mechanism. Its purpose is simple: it directs used water into the waste pipe while helping prevent leaks around the tub opening.

The common industry standard is a nominal 1½-inch drain size. This measurement usually refers to the connected waste pipe, not every visible part. Thread patterns and flange dimensions can still vary. Measure the existing drain before buying a replacement. I have seen nearly identical fittings fail to match because their threads were different. During replacement, the stopper is removed first. A drain key or suitable wrench then loosens the flange. The old gasket should be inspected for cracks, compression, or hardening. The new flange needs an even seal, correct alignment, and careful tightening. Too little pressure may cause leaks. Too much can damage the tub or fitting.

Tips: Clean the drain opening completely before installation. Use a flashlight to check the gasket position. After fitting the drain, add water and watch underneath for several minutes. A dry surface does not always prove a perfect seal, so recheck after the tub has been used. When measurements seem uncertain, consult a qualified plumber instead of forcing mismatched threads.

Drain Assembly Components: Waste-and-Overflow, Stopper, Gasket, and Trap

Bathtub drain replacement means removing the old drain assembly and installing compatible components. The waste-and-overflow unit connects the tub drain to the overflow opening. It directs used water into the trap while preventing an overfilled tub from spilling onto the floor. The stopper controls drainage. Common designs include lift-and-turn, toe-touch, and trip-lever mechanisms. Small parts matter.

A gasket seals the drain flange against the tub surface. Another gasket usually seals the overflow connection. The trap, shaped like a curved pocket, blocks sewer gases and retains enough water for protection. During replacement, a technician checks thread condition, pipe alignment, gasket compression, and hidden corrosion. A new stopper cannot compensate for a cracked drain body. The first inspection is not always right.

The U.S. EPA WaterSense leak guidance reports that household leaks can waste more than 10,000 gallons annually. A loose bathtub gasket may contribute to that waste, although the leak often hides beneath the tub. ASPE’s Plumbing Engineering Design Handbook emphasizes proper drainage, venting, and trap installation for reliable performance. In practice, the drain flange should be tightened firmly, not aggressively. Excess force can distort the gasket or damage the tub surface. Water testing follows installation: fill the tub, release the stopper, and inspect the overflow and trap connections with a dry cloth. One missed drip can become expensive.

What Is Bathtub Drain Replacement and How Does It Work?

This chart shows the common nominal connection size used by the main water-path components in a residential bathtub drain assembly. Waste outlets, overflow connections, and trap connections are commonly 1.5 inches, while the stopper and gasket are sealing components rather than pipe connections. Replacement normally involves removing the stopper, loosening the drain and overflow fittings, renewing the gasket or sealant, checking the trap, and testing for leaks.

Inspection and Sizing: Measuring the 1½-Inch Tub Drain Connection

Bathtub drain replacement begins with a careful inspection, not a wrench. The common tub drain connection is nominally 1½ inches, but that measurement can mislead. It usually describes the pipe size, not the exact opening diameter. Remove the stopper and clean away soap, hair, and mineral deposits. Use a flashlight to inspect the drain flange, crossbars, threads, and visible waste assembly. Look for cracked metal, heavy rust, or standing water around the fitting.

Measure the opening with a tape measure or caliper, if available. Record the flange diameter, thread condition, and distance to the trap connection. A 1½-inch drain may connect through slip joints, compression washers, or threaded fittings. These details affect the replacement method. Do not force a fitting because it appears close in size. It may leak later. It happens.

I recommend comparing the old assembly with the replacement before removing anything. Photograph the connection and mark the pipe direction with a pencil. If the old drain is badly corroded, its threads may give an inaccurate reading. Measure the sound section instead. Check whether the tub uses a standard drain shoe, overflow assembly, or a combined waste-and-overflow unit. I have learned that rushed sizing causes more trouble than difficult removal. A small mismatch can leave the flange loose, damage the tub surface, or create a slow leak beneath the floor. When measurements conflict, verify them twice and consult a qualified plumbing professional.

Step-by-Step Removal of the Old Drain and Overflow Assembly

Bathtub drain replacement begins with removing the old drain and overflow assembly carefully. Place a towel over the tub surface to protect the finish. Remove the overflow cover with a suitable screwdriver. Pull out the stopper, linkage, and spring if the drain uses a connected mechanism. Keep each screw nearby; small parts disappear easily.

Use a drain wrench or internal drain tool to loosen the drain flange. Turn it counterclockwise with steady pressure. If it refuses to move, mineral buildup may be holding it firmly. Avoid striking the tub. Excessive force can crack the surrounding surface or damage the drain shoe beneath the tub. After removing the flange, scrape away old plumber’s putty and clean the opening with a plastic scraper. Removing the overflow elbow may require access behind the tub or through a service panel. Disconnect the waste pipe gently, then lower the old assembly without twisting nearby plumbing.

Tips: Photograph the connections before removal. Test the stopper linkage before discarding it. Wear gloves, but keep a clear grip. A second person can support the pipe while you loosen fittings.

Check the exposed drain opening for corrosion, cracks, or distorted threads. A clean rim improves the new seal. However, perfectly clean work is not always enough; older pipes may remain brittle. If a fitting bends, leaks, or will not separate, pause and inspect it instead of forcing the connection. That small delay can prevent a larger repair.

What Is Bathtub Drain Replacement and How Does It Work? - Step-by-Step Removal of the Old Drain and Overflow Assembly

Stage Component or Action What Happens Typical Tools or Materials Practical Notes
1. Inspection Existing drain and overflow assembly The visible drain, overflow cover, stopper mechanism, and accessible piping are checked for corrosion, leaks, blockage, and compatibility. Flashlight, adjustable wrench, tape measure A replacement should match the tub opening, overflow configuration, stopper type, and existing waste piping.
2. Preparation Water supply and work area The tub is emptied, nearby surfaces are protected, and access panels or wall sections are opened if the drain connections are not reachable from the tub side. Drop cloth, bucket, towels, protective gloves, eye protection The drain line itself normally does not require a water shutoff, but nearby plumbing should be protected from accidental damage.
3. Remove stopper Drain stopper and linkage The stopper is lifted or unscrewed, and any connecting rod, spring, or trip-lever linkage is removed from the drain or overflow opening. Screwdriver, pliers, needle-nose pliers Keep small screws and linkage parts together. Stopper designs vary, so avoid forcing a seized mechanism.
4. Remove drain flange Tub drain flange or strainer The flange is turned counterclockwise and lifted out. A drain wrench grips the inside crossbars when the flange cannot be removed by hand. Tub drain wrench, penetrating lubricant, utility knife Old plumber’s putty or sealant may need to be cut away. Excessive force can damage the tub or the drain shoe below it.
5. Remove overflow cover Overflow plate and gasket The retaining screws are removed, then the cover and attached linkage are carefully pulled away from the overflow opening. Screwdriver, plastic scraper, replacement gasket Do not allow the linkage or screws to fall behind the tub. The gasket should generally be replaced rather than reused.
6. Disconnect piping Waste tee, drain shoe, and overflow tube Slip-joint nuts or fixed pipe connections are loosened from the access side. The old drain and overflow assembly is then separated from the tub. Slip-joint pliers, adjustable wrench, bucket, replacement washers Common bathtub waste piping is often 1½ inches, but the actual size and connection type must be verified before purchasing parts.
7. Clean surfaces Drain and overflow openings Old putty, sealant, mineral deposits, rust, and debris are removed from the tub surfaces and threaded areas. Plastic scraper, non-abrasive pad, cloth, mild cleaner The sealing surfaces must be smooth and dry. Abrasive tools can scratch acrylic, fiberglass, enamel, or porcelain finishes.
8. Install drain flange New drain flange and gasket compound A suitable seal is applied beneath the flange, and the flange is threaded into the drain shoe while the lower connection is held steady. Plumber’s putty or manufacturer-approved sealant, drain wrench The correct sealing material depends on the tub surface and fitting instructions. Tighten firmly without overtightening.
9. Install overflow Overflow gasket, cover, and linkage The new gasket is positioned behind the tub wall, the overflow elbow is aligned, and the cover is secured with its retaining screws. New overflow gasket, screwdriver, adjustable wrench The gasket must sit evenly around the opening. Misalignment is a common cause of leaks behind the tub.
10. Connect assembly Waste tee, washers, nuts, and drain line The drain shoe and overflow tube are connected to the waste tee, and the tee is reconnected to the household drain using the correct washers and fittings. Replacement washers, slip-joint nuts, wrench, approved thread sealant where required Slip-joint washers must face the correct direction. Thread sealant should not be used where a compression washer is designed to make the seal.
11. Reinstall stopper Stopper and operating mechanism The stopper, linkage, spring, or trip lever is reinstalled and adjusted so the stopper opens and closes smoothly. Screwdriver, pliers, clean cloth The stopper should seal the drain when closed but should not bind when operated.
12. Leak test Drain, overflow, and connected piping The tub is filled partially, the stopper is tested, and water is released through the drain while all accessible joints are checked for moisture. Bucket, dry paper towels, flashlight Test both normal draining and overflow conditions. Dry paper towels make small leaks easier to detect.
13. Final check Operation and access area The stopper movement, drainage speed, overflow function, screw tightness, and access-panel condition are reviewed before the work area is closed. Screwdriver, cloth, replacement access-panel fasteners if needed Keep the access area serviceable so future inspections or repairs can be completed without unnecessary demolition.
Typical project duration
Approximately 2–4 hours when access is available and connections are not severely corroded.
Common replacement parts
Drain flange, drain shoe, overflow cover, overflow gasket, waste tee, washers, nuts, and stopper components.
Main leak risks
Damaged sealing surfaces, a displaced overflow gasket, incorrect washers, loose connections, and overtightened fittings.
When professional help may be needed
Severely corroded fittings, inaccessible piping, damaged tub openings, concealed leaks, or changes to fixed drain piping.

Installation, Leak Testing, and Code-Based Drainage Verification

What Is Bathtub Drain Replacement and How Does It Work?

Bathtub drain replacement involves removing the old strainer, overflow cover, gasket, and connected drain fitting. The installer cleans the opening before fitting a new drain body. A drain wrench helps prevent scratches around the tub surface. The overflow gasket must sit evenly, without twisting or excessive compression. Small errors matter here.

Leak testing follows installation. The tub is filled above the drain opening, then released while the installer watches the trap, waste pipe, and ceiling below. A dry area is not proof of success. EPA WaterSense reports that household leaks waste nearly 10,000 gallons of water annually, making early detection practical, not cosmetic. Water should flow steadily without pooling around the strainer.

Code-based drainage verification requires more than watching water disappear. The 2024 International Plumbing Code, Section 1002.4, generally requires a trap seal between 2 and 4 inches. Local amendments may differ. The installer should verify proper trap access, venting, pipe slope, and connection sizes under the locally adopted code. A practical flow test can expose slow drainage or gurgling. Even experienced workers can overlook a partially blocked vent. That is worth reconsidering. The final inspection should record test conditions, visible joints, and any concealed leakage risk.

Back To Top